Q : 如何安裝 php5.6 (統一版本,php 5.6 + Laravel 5.4)
https://www.cadch.com/modules/news/article.php?storyid=227
Repo設置
先確認您的伺服器已經打開SSH通道,然後執行下面指令(您需要有執行指令的權限,如果有必要建議使用root操作,或是sudo):
在CentOS 7下(包含安裝EPEL)
wget http://dl.fedoraproject.org/pub/epel/ ... l-release-7-10.noarch.rpm
wget http://rpms.famillecollet.com/enterprise/remi-release-7.rpm
rpm -Uvh remi-release-7*.rpm epel-release-7*.rpm
如果您原本就已經裝過EPEL則執行下面指令:
wget http://rpms.famillecollet.com/enterprise/remi-release-7.rpm
rpm -Uvh remi-release-7*.rpm
在CentOS 6下(包含安裝EPEL)
wget http://dl.fedoraproject.org/pub/epel/ ... el-release-6-8.noarch.rpm
wget http://rpms.famillecollet.com/enterprise/remi-release-6.rpm
rpm -Uvh remi-release-6*.rpm epel-release-6*.rpm
如果您原本就已經裝過EPEL則執行下面指令:
wget http://rpms.famillecollet.com/enterprise/remi-release-6.rpm
rpm -Uvh remi-release-6*.rpm
啟動程式庫(Repo,repository)
進行到目前為止,我們需要確認程式庫有被啟動,同時選訂我們想要安裝的版本。 We need to head over to
/etc/yum.repos.d you should inside see a file called remi.repo.
使用您喜好的編輯器(Nano、Pico、Vi ...etc)開啟remi.repo這隻檔案,您將看到一部份參數。我們需要確認第一階段
[remi]是啟用狀態。[remi] name=Les RPM de remi pour Enterprise Linux 6 - $basearch #baseurl=http://rpms.famillecollet.com/enterprise/6/remi/$basearch/ mirrorlist=http://rpms.famillecollet.com/enterprise/6/remi/mirror enabled=1 gpgcheck=1 gpgkey=file:///etc/pki/rpm-gpg/RPM-GPG-KEY-remi
這一行
enabled=1確認要設定!在技術上現在是可以繼續進行PHP安裝,但是將只會取得PHP 5.4.X版本。這如果不是你要的,那麼跳到下一步驟!
If we want PHP 5.5 or PHP 5.6 we need to do a bit more work, further down in the
repo.repo file you will see two additional sections [remi-php55] and [remi-php56], decide which PHP version you want to install and then enable the correct. So for PHP 5.6 we would change to:[remi-php56] name=Les RPM de remi de PHP 5.6 pour Enterprise Linux 6 - $basearch #baseurl=http://rpms.famillecollet.com/enterprise/6/php56/$basearch/ mirrorlist=http://rpms.famillecollet.com/enterprise/6/php56/mirror # WARNING: If you enable this repository, you must also enable "remi" enabled=1 gpgcheck=1 gpgkey=file:///etc/pki/rpm-gpg/RPM-GPG-KEY-remi
Q : Larvel 安裝後的 Permission 問題
http://momoiro-tj.hateblo.jp/entry/2016/01/12/221657
$ sudo chmod -R 775 /var/www/laravel/storage
$ sudo chmod -R 775 /var/www/laravel/bootstrap/cache
chcon -R -t httpd_sys_rw_content_t /var/www/laravel/storage
chcon -R -t httpd_sys_rw_content_t /var/www/laravel/bootstrap/cache
Q : SQLSTATE[HY000] [2002] Permission denied
https://stackoverflow.com/questions/42937925/laravel-permission-denied-on-remote-mysql-server-aws-aurora/42977750
排除 port,帳號後,可能是SELinux 問題
sudo setsebool -P httpd_can_network_connect_db=1
Q : 特別設定帳號給 PM 上傳
https://blog.aidec.tw/post/centos7-sftp-ssh-chroot-directory
步驟一(step1):建立會員組
我們要先建立一個給sftp使用的會員組,在這邊我們以
sftp_use 作為會員組的名稱。(當然也可改其他的)sudo groupadd sftp_use
步驟二(step2):建立帳號
建立新帳號:
sudo useradd sftp_test
替sftp_test設定密碼
sudo passwd sftp_test

將sftp_test帳號添加到sftp_use會員組
sudo usermod -G sftp_use sftp_test
步驟三(step3):更新sftp配置
變更sshd_config文件,修改配置
sudo vim /etc/ssh/sshd_config
如果沒有vim 可以改使用vi。也可以使用winSCP將sshd_config下載下來,編輯後在上傳。
進入sshd_config文件後,找到147行左右,會看到下面這行
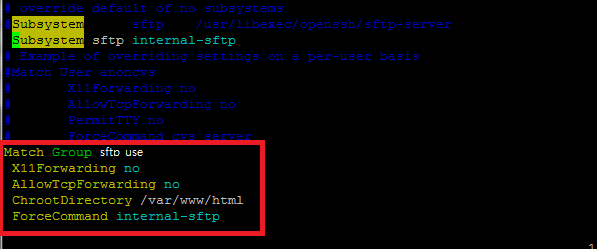
Subsystem sftp /usr/libexec/openssh/sftp-server
將上面這行加上[#]註解掉,並添加下面這行
Subsystem sftp internal-sftp

接著,移動到此文件的最下方,添加以下內容
Match Group sftp_useX11Forwarding noAllowTcpForwarding noChrootDirectory /var/www/htmlForceCommand internal-sftp

說明:
sftp_use:會員組名稱
var/www/html :限制的目錄
步驟四(step4):給予帳號權限
需要進行此步驟,新增的帳號才能有上傳編輯的權限
建立一個資料夾
mkdir /var/www/html/sftp_test
設定權限
chown root /var/www/html/sftp_test
chown root /var/www/html/sftp_test
chmod 755 /var/www/html/sftp_test
chown sftp_test /var/www/html/sftp_test